

DIY Solar Panel Project - The Ingredients
As I mentioned in the previous post, I decided to go with a hybrid charge controller solution for my solar panel setup. What that basically means is that I will need to buy some solar panels and a hybrid charge controller, since I have a UPS and batteries. I will then have to connect them all together. I wanted to start with something simple, so I decided to just buy one solar panel. At the same time I was intending to build it in such a way that it can be extensible to 3 panels in the future. The goal has always been to have a 1 KW setup.
Just the knowledge of what you want to buy is not sufficient to jump in and buy stuff randomly. There has to be a method to the madness. For example a 375 W solar panel may not be compatible with a charge controller that cannot accept more then 45 V open circuit voltage. There are a lot of such details to be considered. So I will dive deep into explaining why I made the choices I did. At any point, if it gets too boring or technical for you, just skip to the next heading. You will not miss anything important, I promise :).
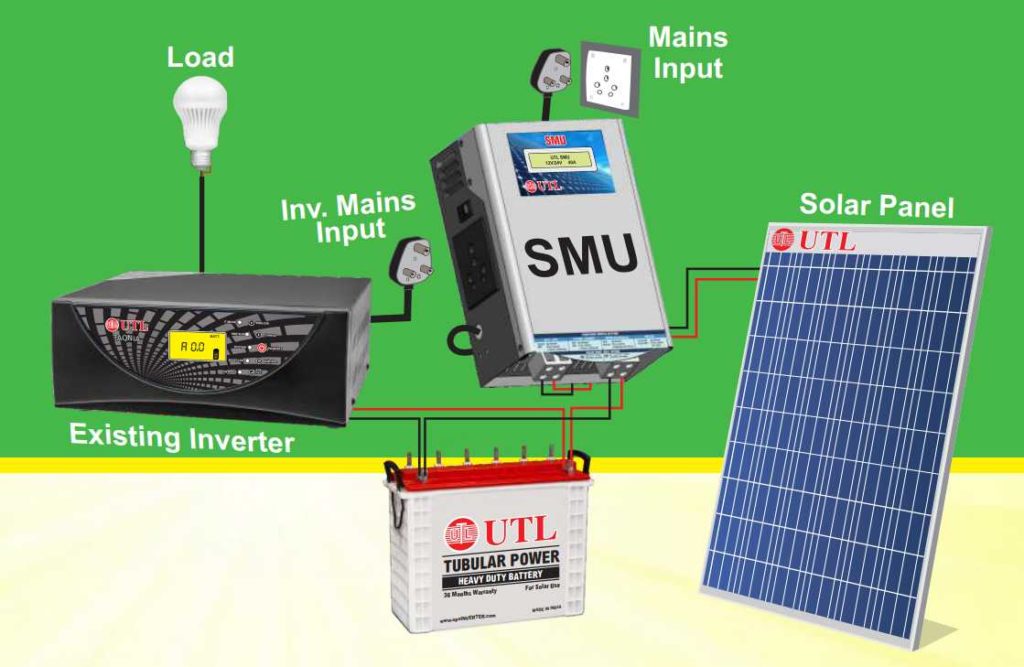
As a refresher, here is the connection diagram again.
Hybrid charge controller (SMU)
As I mentioned before, there are some combinations of charge controller and solar panels that are not compatible. So it helps to fix one of them and find compatible other one. In my case, I first fixed my hybrid charge controller and then tried to find a compatible solar panel.
My requirements for a hybrid charge controller is the following:
- It should be able to handle up to 1 KW panels
- Should work with two batteries in series for a total of 24 V
- Capable of charging 150 AH tubular batteries since that is what I have
After a lot of searching, for a good quality controller that is relatively cheap with those criteria I finally found one. What follows below are some technical details, which you can skip if you'd like.
Technical details
Here are the general specifications of the SMU.
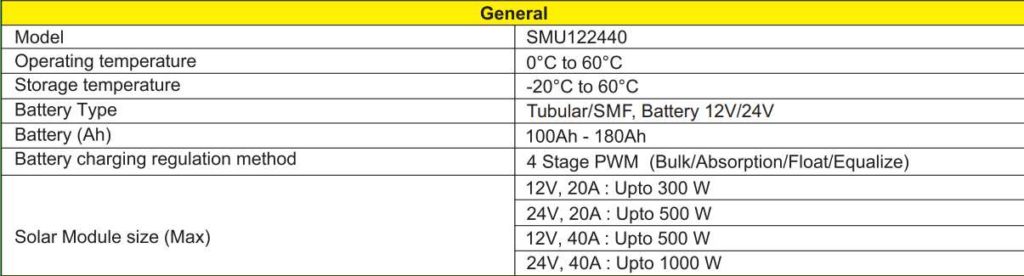
As you will note, the SMU works with 24 V tubular batteries up to 180 AH. Perfect for my setup. Moreover it is capable of handling solar module array generating up to 1000 W. It also has the following "smartness" (as discussed in my previous post) to reduce electricity bill.

Mains are connected to the UPS when there is no solar power. When the battery voltage is more than 27.6 V the mains are disconnected. The reason is that the battery is fully charged and any additional solar power will be wasted. So might as well disconnect the grid and use solar + battery power to handle your load. The SMU will continue to handle the load with solar and battery until the battery voltage dips below 23.6 V, at which point the mains are connected. Then the batteries will be charged on solar + grid power.
Solar panel
Now that the SMU is finalized, we move on to solar panels. There are a lot of choices here. Since I had some selection criteria the number came down a bit. Basically I was looking for a 24 V panel (remember my two 12 V batteries in series?). Which means anything less than 250 W panels are out since they produce less than 24 V. From there are we can go all the way up to 500 W panels I guess, but there is ceiling over there too. The reason is the SMU I finalized. Here are the electrical specs on the SMU to help you understand why.
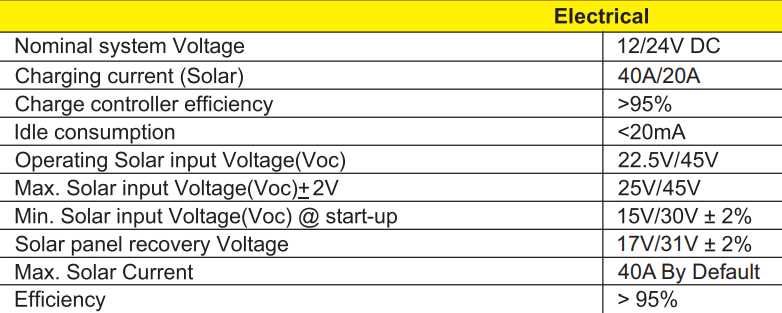
Did you find it? Well the SMU has a maximum solar input voltage rating of 45 V. That means the solar panel I am planning to buy should not generate voltage greater than 45 V. That rules out a bunch of panels beyond 350 W.
The next question for me was to choose between a monocrystalline panel vs a polycrystalline panel. For those who are unaware, a monocrystalline panel generates more power for the same surface area as compared to a polycrystalline panel. Also monocrystalline are supposed to be more efficient in low light conditions. The disadvantage however is that monocrystalline panels are more expensive. Given that I am living in Bangalore where it is cloudy for a good part of the year I decided to go with the more expensive but efficient monocrystalline panel.
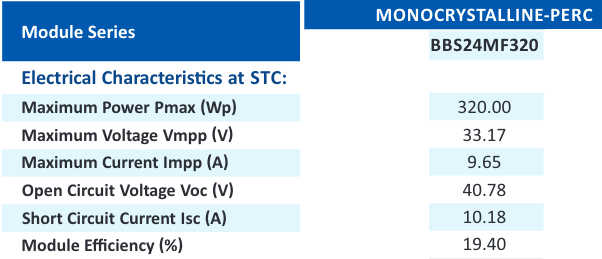
The search began for monocrystalline panels between the range of 250 and 350 W. The most value for buck (at the time) seemed like a 320 W panel which I promptly purchased.
Technical details
Looking at the electrical characteristics, you will notice it falls within the limits of my SMU. The maximum open circuit voltage is 40 V which is less than 45 V that the SMU can handle. The maximum current is 9.65 A which means if I add another 2 panels (for a total of 1 KW), the total current generated will be less than 30 A. The SMU can handle up to 40 A, so all good there too.
Connectors
Next I needed some cables to connect the solar panels to the SMU. But before we get to cables, we need to understand how solar panels connect to other panels and charge controllers. You see, most solar panels don't have screw terminals, instead they terminate into MC4 connectors. When you are searching for cables to connect the panels you should be searching for ones that terminate in MC4 connectors.

MC4 connectors have several benefits, they
- provide safety by not exposing terminals, reducing the risk of electric shock
- can be easily connected to other cables with MC4 connectors
- once plugged in they cannot be pulled apart unintentionally
- they are water sealed and UV proofed, so can be exposed to elements
Cables
My UPS and batteries are in the ground floor in my backyard. My solar panels will be stationed on the terrace. The SMU will sit along side of the UPS on the ground floor too. So I need some wires that connect the panels from terrace to SMU. I measured the distance and it came to about 10 meters. Then I started my hunt for a 10 m cable with MC4 connectors.
But of course you cannot use any cable you like. Depending on the length of the wire there will be electrical losses in the cable. If you choose a thin long cable, there will be a huge drop in the voltage due to resistance in the wire. If you choose a thick low resistance wire, your costs will go up quite significantly. So I need to make some calculations to get the optimal sized cable while maximizing value.
Technical details
There is a handy tool on the internet to calculate the size of cable you will need based on your requirements. The tool needs you to input Vmp, Imp, wire length and acceptable losses. In our case using the technical sheet of the panel from above we know Vmp = 33 V. For Imp I used 30 A although from the sheet it should be 9.65 A. The reason is I know I will upgrade my setup to 3 panels in future. So the cable should be able to handle 9.65 x 3 = 30 A approximately. I want to buy a cable today that will work even when I upgrade in future.
For cable length I used 33 ft (approximately 10 m). Finally for acceptable losses I went with 4%. The tool recommends using 2-5% as acceptable losses. So I went with 4%. If you use a lower number you will have to pay more for a thicker cable. A higher number will save you in the initial cost, but you will have losses for the lifetime of the cable. When I plugged in those numbers I got a gauge size of 8 AWG.
You can normally search for an 8 AWG cable, but some people advertise in mm2 size. So I used an AWG to mm2 conversion table to find that 8 AWG is 10 mm2. I finally ordered a pair on amazon.
Battery cables
Next I need cables to connect the SMU to batteries. I ordered a pair of 25 mm2 cables for this purpose which is probably an overkill.
Cost
I finally got everything I needed and here is the cost breakdown.
| Solar panel | 9950 |
| Solar converter kit | 2219 |
| Solar panel to SMU cable | 2100 |
| SMU to battery cable | 729 |
| Total | 14998 |
Note that the prices are from February 2021 which is when I started the project. With this cost the return on investment should take around 4 years. Lets see if that really happens after 4 years :). In my next post I will explain how I went about wiring everything together.