

CamillaDSP in CoreELEC
I have a 5.1 surround system and that was good enough for my needs. But there is one problem that has been bothering me for a while and that is the room’s frequency response. I don’t have a dedicated home theater room. The TV and surround sound is in my living room with a lot of open spaces. The floor, walls and ceiling are all very reflective surfaces. Which means the audio experience is not the greatest.
I have a bit of a complicated setup but I will spare you the details because they are not very relevant to this post. Here are some basic details:
- I have a media center PC running Kodi – more precisely I have the X96 air (4GB version) running CoreELEC.
- The X96 air’s HDMI out is connected to an AVR
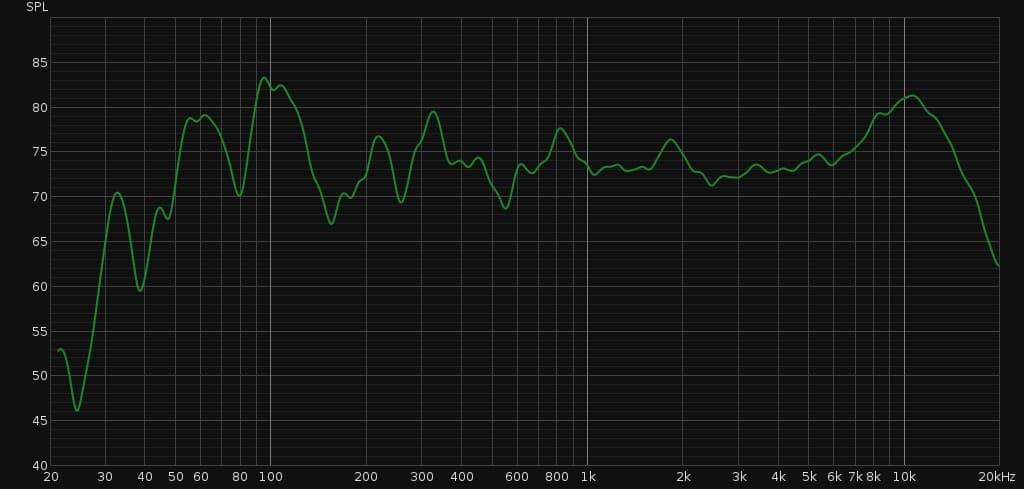
As I mentioned before, the frequency response at the place we sit to watch movies / listen to music does not have a good reproduction. Some frequencies are too soft, some are too loud etc. You can get an idea from the frequency response graph from one of the speakers below.
To fix the issue, I have always wanted an equalizer in Kodi. Unfortunately though, none were available. After a lot of searching I found that CamillaDSP is something that could fit the bill. It is a very well documented project, but it still took some time for me to understand. So here are the steps that I followed and had success.
Initially, I downloaded the latest aarch64 version of the app available at the time. Unfortunately though, it did not work on X96 air. When I ran the command, I got cannot execute: required file not found. Google search was not of much help. I figured it could either mean I did not have all the dependencies or the architecture was wrong. But I thought S905X3 uses the aarch64 instruction set. So I thought it was the dependencies. I wasted a lot of time figuring out the dependencies when it was really just an instruction set issue. I eventually just though I will use the armv7 build of CamillaDSP and it worked instantly!
So for those of you having trouble running the aarch64 version of the app, do give the armv7 version a try.
Now I need to first capture the audio coming out of Kodi (the media player), apply the filters (equalizer) and then route the modified audio to HDMI. You need to write a configuration file in YAML to do all that. I did not want to work with yaml in a text editor because I tend to make a lot of mistakes with the indentation and formatting. Fortunately there is a CamillaGUI which can be used to configure the inputs, outputs and filters.
I downloaded the latest armv7 version of the app and it worked on the first try. But it will need some configuration to be able to connect to CamillaDSP. Go to the location where you unarchived CamillaDSP GUI and open _internal/config/camillagui.yml. Change config_dir, coeff_dir, default_config, statefile_path and log_file to point to where you unarchived CamillaDSP. Here is my configuration:
---
camilla_host: "127.0.0.1"
camilla_port: 1234
bind_address: "0.0.0.0"
port: 5005
ssl_certificate: null
ssl_private_key: null
gui_config_file: null
config_dir: "~/workspace/camilladsp/configs"
coeff_dir: "~/workspace/camilladsp/coeffs"
default_config: "~/workspace/camilladsp/default_config.yml"
statefile_path: "~/workspace/camilladsp/statefile.yml"
log_file: "~/workspace/camilladsp/camilladsp.log"
on_set_active_config: null
on_get_active_config: null
supported_capture_types: null
supported_playback_types: null
To capture the audio coming from Kodi, we have to create a loopback audio device and make Kodi send audio to the loopback playback device. To achieve this, you have to insert the snd-aloop module, which creates 2 virtual audio cards.
$ modprobe snd-aloop
$ aplay -l

...
card 1: Loopback [Loopback], device 0: Loopback PCM [Loopback PCM]
  Subdevices: 8/8
  Subdevice #0: subdevice #0
  Subdevice #1: subdevice #1
  Subdevice #2: subdevice #2
  Subdevice #3: subdevice #3
  Subdevice #4: subdevice #4
  Subdevice #5: subdevice #5
  Subdevice #6: subdevice #6
  Subdevice #7: subdevice #7
card 1: Loopback [Loopback], device 1: Loopback PCM [Loopback PCM]
  Subdevices: 8/8
  Subdevice #0: subdevice #0
  Subdevice #1: subdevice #1
  Subdevice #2: subdevice #2
  Subdevice #3: subdevice #3
  Subdevice #4: subdevice #4
  Subdevice #5: subdevice #5
  Subdevice #6: subdevice #6
  Subdevice #7: subdevice #7
Then, go to Kodi > Settings > System > Audio > Audio output device and change it to something that says loopback device. I am not sure if it matters which device you pick but I selected “ALSA:Loopback (surround71:CARD=Loopbakc,DEV=0), Loopback PCM”. At this point you have to stop Kodi first so it can release all handles to any audio devices. Run your camillaDSP software and GUI then start Kodi. Here are all the commands in the right order.
systemctl stop kodi
./camilladsp -s statefile.yml -w -p 1234 &
sleep 10
./camillagui_backend
systemctl start kodi
With that out of the way, we can now configure CamillaDSP to read data from the loopback capture device, apply filters and route data to HDMI. Open a web browser and navigate to http://<your kodi device IP>:5005. In the Devices tab of the UI, change capture device to “hw:Loopback,1,0”. Next change the playback device to where ever you want your audio out to go to. For example in my case it is HDMI out (see screenshot below). You might have to try out a few playback devices while playing something in Kodi to find the right device.

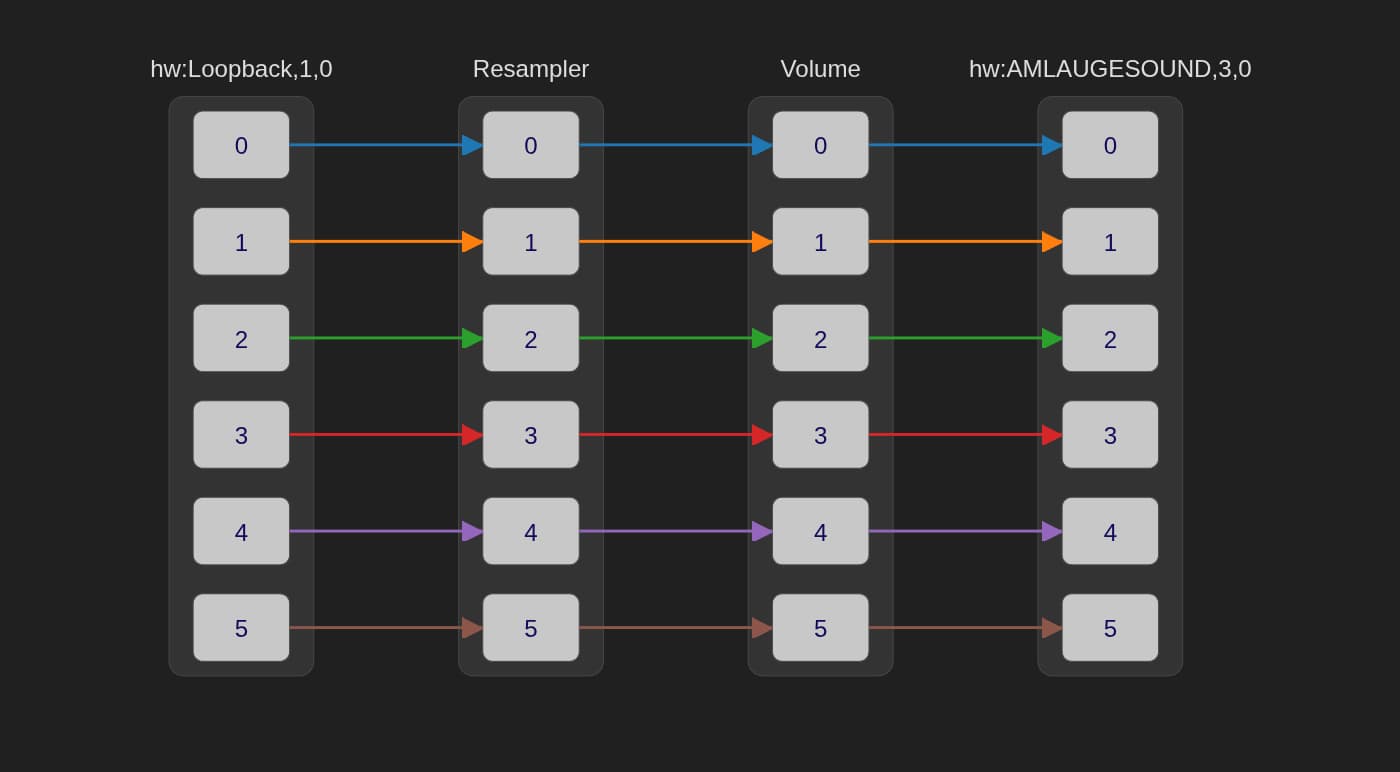
At this point you should have everything working end-to-end. Kodi will write to Loopback device, CamillaDSP will pick up the audio from the Loopback device and route it to the output device. Your pipeline should look something like this.
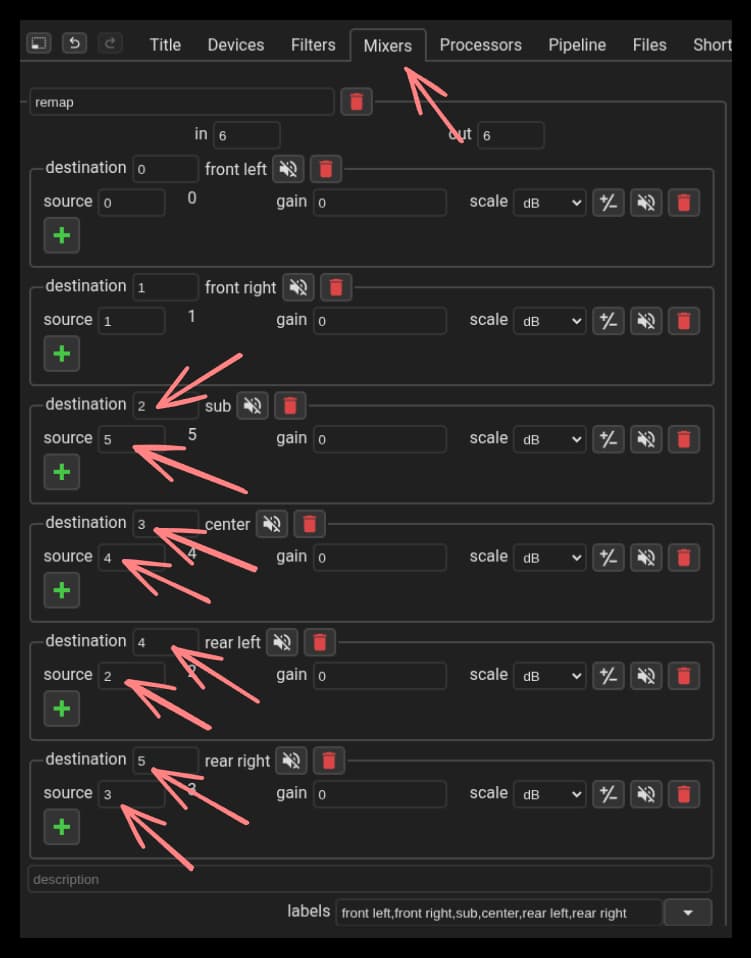
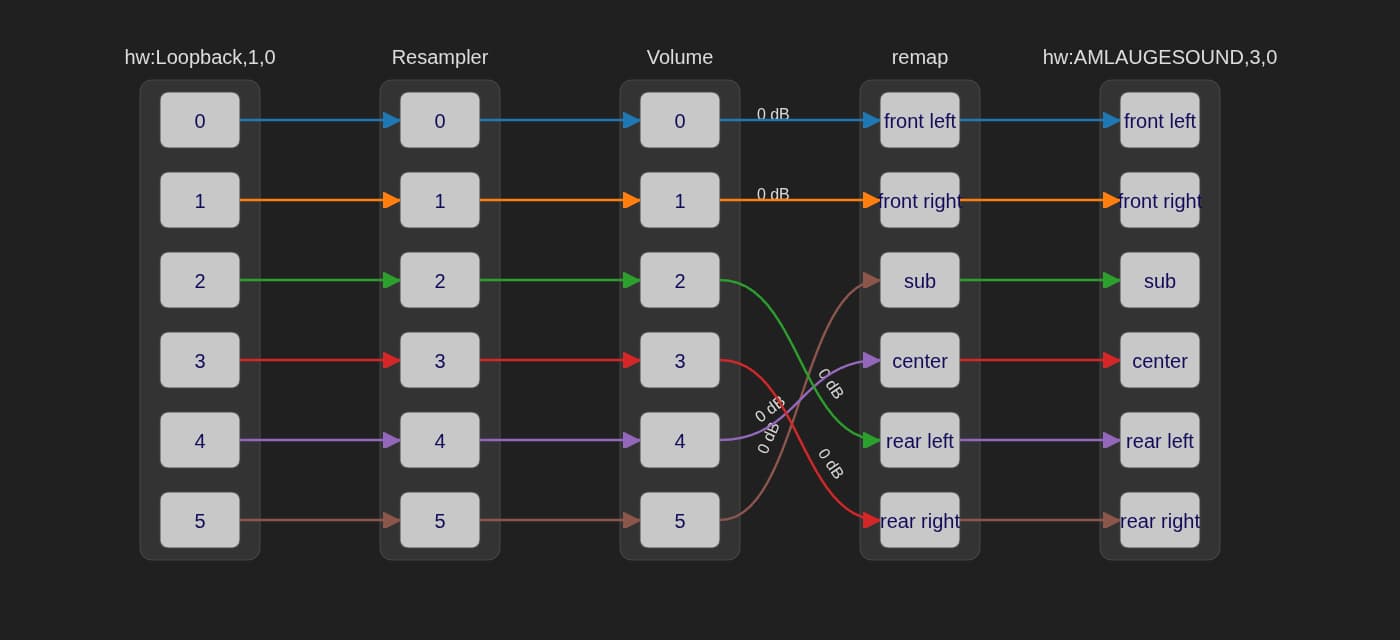
Make sure you check all audio channels. In my case the mappings were wrong. The rear right channel audio was going to sub woofer channel etc. So I remapped them in Mixers section in CamillaDSP GUI (see screenshot below). I also renamed the channels so they have labels like “front left” instead of 0.
Next, add the mixer to the pipeline
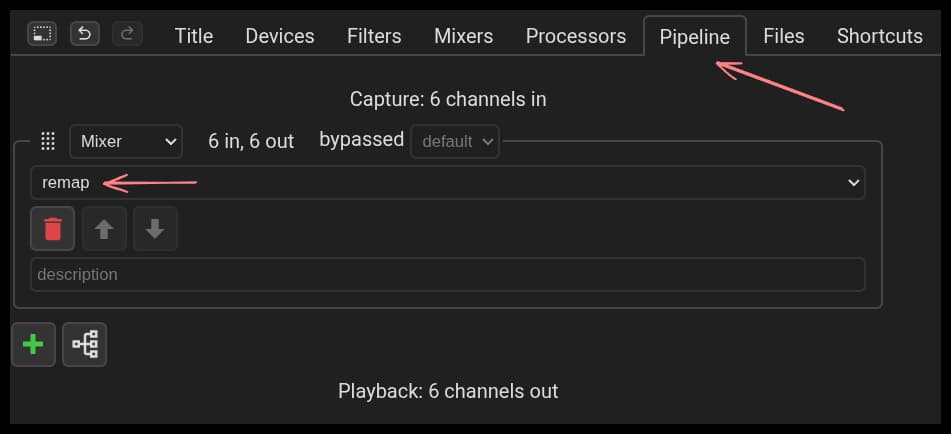
So my pipeline looks like this now
That is all you need to get CamillaDSP working with Kodi. In my next post I will explain how I got filters from room EQ wizard and applied them in CamillaDSP to compensate for the frequency response irregularities in my living room.
References
- https://github.com/HEnquist/camilladsp
- https://github.com/HEnquist/camillagui-backend
- https://github.com/mdsimon2/RPi-CamillaDSP