

Commento As Comments Engine In Jekyll
Last time I wrote about my adventures with moving comments engine from Disqus to Remark42. This is a continuation of that story. While I liked pretty much everything about Remark42, one thing that did not work out for me was spam protection. Remark42 does not have, or at least it did not have a proper automated spam protection mechanism in place at the time I tried it out. With the default WordPress comments engine, you could add Akismet for spam protection. I could not figure out any way to install spam filters in Remark42. The only way would be to hold the comments for approval. Then I have to approve each comment manually. This would be too much work for me. Not that I get a lot of comments on the blog, but still, why should a human take care of such things when an automated system could do it for me?
Enter Commento
Like I was saying, I had to find a comments engine that can also do automated spam protection. After some more searching I found Commento which allows integration with Akismet. The process of porting to a new comments engine started all over again. However, the process was strikingly similar to setting up Remark42, so it was not too bad in the end.
Install Postgres
One disadvantage of using Commento is that you need install Postgres. Unlike Remark42 which would just use a flat file to store comments, Commento stores comments in a relational database using Postgres. Anyway this is the only additional dependency, so I went ahead with it. There are a lot of tutorials out there on the web, so I won’t repeat them again. I just followed one such guide. First install it –
sudo apt update
sudo apt install postgresql postgresql-contrib
Next we need to configure Postgres. Login as Postgres user sudo -i -u postgres. Then create a commento user name and password createuser commento --pwprompt. Remember the password that you type in here because you will need it later. Create a commento db with owner as commento by running createdb commento -O commento and we are done with the configuration.
Running Commento server
I downloaded the binary from their website and saved it into Google Compute Engine instance where the server will run. Wrote a small script run.sh to run it.
export COMMENTO_ORIGIN=http://YOUR_URL
export COMMENTO_BIND_ADDRESS=0.0.0.0
export COMMENTO_PORT=80
export COMMENTO_POSTGRES=postgres://commento:COMMENTO_POSTGRES_PASSWORD@127.0.0.1:5432/commento?sslmode=disable
export COMMENTO_CDN_PREFIX=$COMMENTO_ORIGIN

COMMENTO_BINARY_LOCATION/commento
YOUR_URL will be some URL you like to use to access the comments engine’s admin panel. It can be something like comments.YOUR_DOMAIN.com. COMMENTO_POSTGRES_PASSWORD will be the same password that you used when you created commento user in Postgres configuration.
Installing Commento service
Since I am running this on my compute engine instance, I want the comments engine to run automatically whenever the instance reboots. So I created a simple startup service /etc/systemd/system/commento.service.
[Unit]
Description=Commento daemon service
After=network.target postgresql.service

[Service]
Type=simple
ExecStart=COMMENTO_BINARY_LOCATION/run.sh

[Install]
WantedBy=multi-user.target
Install the service by running the following commands on your compute engine instance
sudo systemctl daemon-reload
sudo systemctl enable commento.service
sudo systemctl start commento.service
Enable SSL
Next we need to install SSL certificates. I decided to use Nginx to run my server and renew SSL certificates. So installed Nginx sudo apt install nginx. Next I configured Nginx with sudo nano /etc/nginx/sites-available/commento and pasting the following code.
  server {
      server_name YOUR_URL;

      location / {
          proxy_set_header Host $http_host;
          proxy_set_header X-Forwarded-For $proxy_add_x_forwarded_for;
          proxy_set_header X-Forwarded-Proto $scheme;
          proxy_set_header X-Real-IP $remote_addr;
          proxy_pass http://localhost:8080;
      }
  }
Finally copy over the script to sites-enabled and restart Nginx.
sudo ln -s /etc/nginx/sites-available/commento /etc/nginx/sites-enabled/commento
sudo systemctl restart nginx
Next install certbot and SSL certs.
sudo apt-get install certbot python3-certbot-nginx
sudo certbot --nginx
Setup a cronjob so that the SSL certs will be auto-renewed.
sudo bash
crontab -e
and add the following line
0 12 * * * /usr/bin/certbot renew --nginx --quiet
Update run.sh script with the new configuration
export COMMENTO_ORIGIN=http://YOUR_URL
export COMMENTO_BIND_ADDRESS=0.0.0.0
export COMMENTO_PORT=8080
export COMMENTO_POSTGRES=postgres://commento:COMMENTO_POSTGRES_PASSWORD@127.0.0.1:5432/commento?sslmode=disable
export COMMENTO_CDN_PREFIX=$COMMENTO_ORIGIN

COMMENTO_BINARY_LOCATION/commento
Import Disqus comments
Since I moved from Remark42 to Commento in a very short time, there were no new comments in the Remark42 engine. So I decided to import comments from Disqus to Commento directly. To start the process you will first need to run the Commento server by executing the run.sh script above. Then hit http://YOUR_URL/login and create a new account.
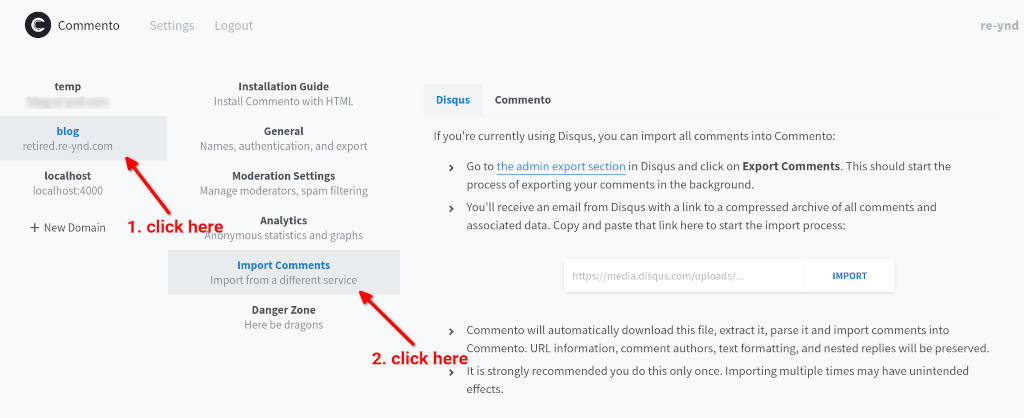
After logging in click on “New Domain” button and enter your blog name and website domain. Then click on your blog on the left and click on “Import Comments” in the middle section. Then follow the same instructions as before to export Disqus comments. When you get an email from Disqus, use that same url and paste it in the import text field in Commento admin panel. Click “Import” and your comments should be imported.
Enable social comments using Google account
Like before, I wanted anyone who wants to comment on my blog to be able to use Google login to post their comments. Since I already had a Google project all setup from my Remark42 time, I reused the same. The run.sh script now changed into this –
export COMMENTO_ORIGIN=http://YOUR_URL
export COMMENTO_BIND_ADDRESS=0.0.0.0
export COMMENTO_PORT=8080
export COMMENTO_POSTGRES=postgres://commento:COMMENTO_POSTGRES_PASSWORD@127.0.0.1:5432/commento?sslmode=disable
export COMMENTO_CDN_PREFIX=$COMMENTO_ORIGIN

export COMMENTO_FORBID_NEW_OWNERS=true

export COMMENTO_GOOGLE_KEY=YOUR_CLIENT_ID
export COMMENTO_GOOGLE_SECRET=YOUR_CLIENT_SECRET

COMMENTO_BINARY_LOCATION/commento
Setup SMTP to receive emails
Again, like before I wanted Commento to send an email to the admin when someone leaves a comment and to the commenter when someone replied to their comment. Since I already had a zoho SMTP configuration all done as part of Remark42 setup, I reused the same in the script.
export COMMENTO_ORIGIN=http://YOUR_URL
export COMMENTO_BIND_ADDRESS=0.0.0.0
export COMMENTO_PORT=8080
export COMMENTO_POSTGRES=postgres://commento:COMMENTO_POSTGRES_PASSWORD@127.0.0.1:5432/commento?sslmode=disable
export COMMENTO_CDN_PREFIX=$COMMENTO_ORIGIN

export COMMENTO_FORBID_NEW_OWNERS=true

export COMMENTO_SMTP_HOST=smtp.zoho.com
export COMMENTO_SMTP_USERNAME=YOUR_ZOHO_EMAIL
export COMMENTO_SMTP_PASSWORD=YOUR_ZOHO_PASSWORD
export COMMENTO_SMTP_PORT=465
export COMMENTO_SMTP_FROM_ADDRESS=YOUR_FROM_EMAIL

export COMMENTO_GOOGLE_KEY=YOUR_CLIENT_ID
export COMMENTO_GOOGLE_SECRET=YOUR_CLIENT_SECRET

COMMENTO_BINARY_LOCATION/commento
Akismet
The only configuration remaining on the backend is to setup Akismet for spam protection. This is quite simple. If you already have an Akismet key, just use that in run.sh like below and you are done.
export COMMENTO_ORIGIN=http://YOUR_URL
export COMMENTO_BIND_ADDRESS=0.0.0.0
export COMMENTO_PORT=8080
export COMMENTO_POSTGRES=postgres://commento:COMMENTO_POSTGRES_PASSWORD@127.0.0.1:5432/commento?sslmode=disable
export COMMENTO_CDN_PREFIX=$COMMENTO_ORIGIN

export COMMENTO_FORBID_NEW_OWNERS=true

export COMMENTO_SMTP_HOST=smtp.zoho.com
export COMMENTO_SMTP_USERNAME=YOUR_ZOHO_EMAIL
export COMMENTO_SMTP_PASSWORD=YOUR_ZOHO_PASSWORD
export COMMENTO_SMTP_PORT=465
export COMMENTO_SMTP_FROM_ADDRESS=YOUR_FROM_EMAIL

export COMMENTO_GOOGLE_KEY=YOUR_CLIENT_ID
export COMMENTO_GOOGLE_SECRET=YOUR_CLIENT_SECRET

export COMMENTO_AKISMET_KEY=YOUR_AKISMET_KEY
export COMMENTO_GZIP_STATIC=true

COMMENTO_BINARY_LOCATION/commento
Configure the frontend
Finally it is time to configure the frontend which again is quite simple like with Remark42. You just have to copy-paste the following script some where in the head section of your html.
<script defer src="https://YOUR_URL/js/commento.js"></script>
Then you will have to add the following div element to each of your posts where you want to show the comments section.
<div id="commento"></div>
That’s it. I finally have a good comments engine with spam protection. This post also marks the end of my comments engine setup. It is working well, does not have issues with privacy and quite lightweight too. This is the comments engine you are now looking at below. However, there is still more I want to say about the migration from WordPress to Jekyll which I will cover in future posts to your utter boredom :).